
AWS Elastic Beanstalk is an easy-to-use service for deploying and scaling web applications. It supports services developed with Java, .NET, PHP, Node.js, Python, Ruby and Go on well-known servers such as Apache, Nginx, and IIS. You can simply upload your code and Elastic Beanstalk automatically handles the deployment – from capacity provisioning, load balancing, auto scaling to application health monitoring. At the same time, you retain full control over the AWS resources powering your applications and have complete access to the underlying resources.
Spot Instances
Spot Instances are spare computing capacity available at deeply discounted prices. AWS allows users to bid on unused EC2 capacity in a region at any given point and run those instances for as long as their bid exceeds the current Spot Price. The Spot Price changes periodically based on supply and demand, and all users bids that meet or exceed it gain access to the available Spot Instances.
Batchly
Batch.ly is a solution that balances AWS workloads to achieve On-Demand availability at spot prices. Batchly’s unique algorithm and tighter integration with Auto Scaling Groups, Elastic Beanstalk, Custom AMI’s and EMR provides a highly reliable way to use spot instances in every layer of your application without compromising on your application’s uptime / availability.
In this post, I will delve a bit deep into AWS Elastic Beanstalk service and how you can manage it via Batchly to achieve up to 80% savings on your EC2 costs. By the time you finish reading this article, I hope you will appreciate the value that Spot Instances and how Batchly makes it extremely easy and efficient to gain the cost advantage.
AWS Elastic Beanstalk
As mentioned earlier, AWS Elastic Beanstalk makes it easy for developers to deploy and manage applications. It consists of an Environment which can be of two types:
- Web Server Environment
- These are standard web-tier applications that listen to HTTP requests, typically over port 80.
- Worker Environment
- These are specialized applications that have a background processing module that polls for messages from an Amazon SQS queue.
Web Server Environment
The web server environment is relatively easy to create via the AWS console. Just upload the application bundle, select “load balancing, auto scaling” for a real-world application and AWS Elastic Beanstalk takes care of the rest. By default, an Elastic Load Balancer (ELB) and an Auto Scaling Group (ASG) would get created. Depending on the scaling policies, the cluster size increases or decreases.
Pretty simple and all the instances launched would be On-Demand Instances ensuring high availability but at a price.
Worker Environment
These environments are for those workloads that take a long time to complete. A daemon running on every EC2 instance in the cluster polls for messages from an Amazon SQS queue and POSTs a request to localhost with the contents of the queue message in the body. Once a 200 OK is received, that message is deleted from the queue. Even in this case, after you upload the application bundle, an ASG gets created.
Again, it is simple. Only On-Demand instances are launched. However, given the nature of the workload, there is scope for down time tolerance as the requests are processed asynchronously.
Create an Elastic Beanstalk application via Batchly
You can create an Elastic Beanstalk application via Batchly to automatically start using Spot Instances to maximize your savings.
Login to the Batchly dashboard, go to “App Store” and select “Elastic Beanstalk”. Batchly consumes your existing applications and the corresponding environments and takes control of managing your application.
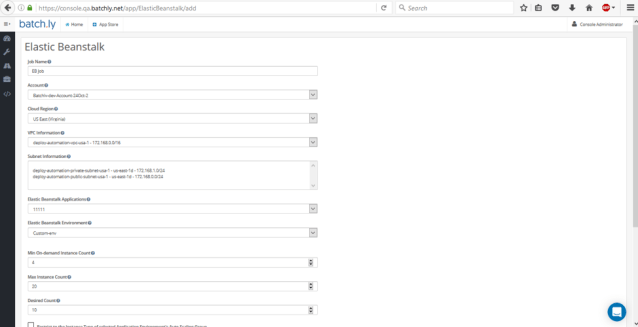
When creating the application via AWS console, I had used the following ASG configuration for a skeletal system:
Min = 2, Desired = 2, Max = 4
Now I have changed this setting to reflect the new configuration, so that the same cluster can handle peak traffic:
Min = 4, Desired = 10, Max = 20
“Why do it through Batchly?”, you ask.
The Batchly Advantage
I had previously mentioned that all the instances launched are On-Demand Instances. This is good but expensive. Based on the above example, in order to reduce costs without not compromising on high availability concerns, Batchly implements the following procedure:
Step 1: It first changes the configuration of your current ASG by setting all values to the Min value
- Min = 2, Desired = 2, Max = 2
- This effectively disables your ASG
Step 2: It launches 4 On-Demand Instances to ensure that the application never faces a downtime
Min = 4
Step 3: It then launches 6 Spot Instances to maintain the Desired count
Desired = Min + 6
Batchly continuously monitors the health of the instances as well as the cluster. If some of the instances have degraded, then those instances are removed from the cluster and additional Spot Instances are launched to maintain Desired capacity.
Elastic Beanstalk Deployments – Automatically handled by Batchly
I will not delve into the deployment details in this post but would just like to touch the surface. When you want to upgrade to newer versions of your applications, you can do so from the AWS console or AWS CLI tools. Once you deploy the new version, the cluster health becomes Degraded. As Batchly is continuously monitoring the cluster health, it sees the new cluster status and understands that the user has made a new deployment. Batchly would then replace the cluster instances and provision new ones with the latest application. In this fashion, Batchly ensures that all instances run the latest application though that is deployed via the AWS console or AWS CLI tools.
Batchly uses a potent combination of Reserved Instances, Spot Instances and On-Demand Instances to give you substantial savings as well as ensuring high availability at all times. Our customers have been running Elastic Beanstalk applications via Batchly. They have consistently achieved over 60% cost savings over On-Demand Instances. Don’t believe me? You can start your free trial and check this for yourself.
X-Post from cmpute.io blog

